
This page is designed to give you a full overview of all the tightening torque values and sequences you may come across when doing any work on your 1.8T. From head bolt tightening torques and sequences, clutch and flywheel torque settings or timing belts. We have them all.
Cylinder head and Valvetrain
This section gives details on head bolts/studs for tightening down the cylinder head to the block. We also have other torques such as the camshaft carrier caps, cam chain tensioner bolts, upper timing belt pulley
Head Bolts and Studs
Renew bolts: Yes
- Stage 1 Tighten 40Nm
- Stage 2 Tighten 90°
- Stage 3 Tighten 90°

ARP offer two different options for the 1.8T head. They had a standard bolt option or there is the stud and nut. The stud and nut will offer better clamping force than the bolt.
For the ARP hardware, we recommend following the instructions found inside the packaging of your bolts/studs as the tightening torques differ to that of standard OEM. If you have lose the instructions, ARP have them all online available here: ARP Product Instuctions
It is always recommended to go over each stage twice at the set torque, as once more and more bolts are tightened up, the first few will have slackened off a bit as the head is pulled down by the other studs.
Camshaft Bearing Carrier Caps
When replacing the camshafts in the engine, it is important to ensure that the caps are correctly tightened up in sequence to allow the camshafts to seat home properly. Careful attention should also be paid to the orientation of the camshaft caps, as they have a small oil-way inside of them which is designed to match up with the oil-way on the cylinder head casting. The recommendation for installing the camshafts is that the lobes of the cams on Cylinder 1 should point upwards. This removes any pressure on the cams from forcing the valves open.
Once the camshaft chain has been correctly set. (16 links/rollers between the notched markings on the camshaft. You should tighten the Camshaft tensioner down to a value of 10nm. This should be done PRIOR before the camshaft carrier caps are installed.
The inlet and exhaust bearing caps are torqued to a value of 10Nm. It is important to start with caps number 2 and 4 ensuring they are tightened diagonally and alternately to the required 10nm. Good practice is to do this in small incremental stages between caps and bolts until the torque value is reached. This ensures the cap is pulled up squarely during the tightening phase.
Once caps 2 and 4 have been torqued down, the remaining caps can be tightened down to 10nm. Further good practice is to go round every bolt again with the torque wrench to ensure all bolts are correctly torqued once all caps have been installed.
Remember the correct orientation of the oil-ways and the number of the caps shown below. These bolts can be re-used.
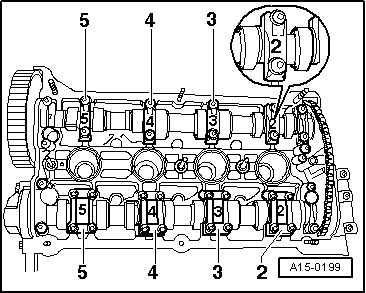
The Timing chain tensioner bolts are also torqued up to 10Nm. Ensure the 2 gaskets are fitted, including the half moon gasket before fitting the tensioner. A small amount of sealant should also be used in the specified area to prevent oil leaks.
Camshaft Timing Pulley Bolt
The upper timing belt pulley is held on with a 16mm bolt to the exhaust camshaft. There are ARP upgrade options for this bolt as well as the OEM spec bolt. Please follow your ARP instructions for their recommended torque setting for this bolt.
The OEM torque value for this bolt is: 65Nm
Camshaft Hall Sensor
The camshaft hall sensor fits onto the intake camshaft at the front of the engine. This works in unison with the crankshaft sensor to ensure the engine is timed correctly and for various ECU functions. There are two different types of hall effect sensor plates for the 1.8T depending on which ECU type you are running.
The 2 bolts securing the sensor should be torqued to: 10Nm
Rocker Cover
The rocker cover is held on with a selection of 10mm nuts around the outside of the cover and a few bolts across next to the coilpacks. There are 2 gaskets that need to be fitted prior. There is a large rectangle one that seats around the outside on the studs from the head and a small one that sits over the top of the spark plug chambers to prevent oil ingress into the spark plug location.
The rocker cover bolts should be torqued to 10Nm
Spark Plugs
It is important to properly torque the spark plugs into the head to avoid any potential damage to the fragile ceramic on the spark plug body.
The recommended torque setting for the spark plugs is: 30Nm.
Please have a look at our Engine Tuning pages for advice on our recommended Spark plug type for various stages of tuning you are going for.
Crankshaft and Connecting Rods
This section will detail the bottom end torque figures such as the bearing caps, connecting rods, oil pump, flywheel and clutch as well as sump bolts and knock sensor bolts.
Crankshaft Bearing Caps
It is important to ensure that the bearing caps are installed with the correct bearing and clearance prior to tightening the bolts for the caps. The caps are also numbered 1 to 5, with number 1 bearing cap being installed closest to the timing belt and number 5 closest to the flywheel. Special attention should be paid to number 3 which houses the thrust washers for the crankshaft and number 4 which has an additional oil-way and the bearing.
Renew bolts: Yes
- Stage 1 Tighten 65Nm
- Stage 2 Tighten 90°
Sender wheel
There is a sender wheel on the crankshaft for the timing pulses to be read by the crankshaft sensor. This wheel can only be installed in one orientation as the holes are offset.
Renew Bolts: Yes
- Stage 1: 10Nm
- Stage 2: Tighten 90°
Oil Pump and Pickup Pipe
The oil pump is a crucial part for supplying oil around the engine ensuring parts are properly lubricated.
The bolts should be tightened to: 15Nm. There is no requirement to renew these bolts
There is also a small chain tensioner that tensions the oil pump chain. This is bolted to the block. Take note of the little spring mechanism and how it sits against the block to ensure proper tension when installed.
The bolt should be tightened to: 15Nm.
There is no VW supplied torque settings for the oil pickup pipe, so if you are rebuilding your engine from fresh or even have the sump off, we STRONGLY recommend replacing the oil pickup and rubber o-ring whilst everything is off. The parts are only £10-15 so well worthwhile.
We would recommend torquing the two bolts up to around 10-15nm or by feel by hand
Oil Squirters
The oil squirters feed oil to the base of the piston to provide cooling and are held onto the block casing with a pressure relief screw/bolt.
These bolts should be torqued to: 27Nm. There is no requirement to renew these bolts.
Oil Sump
The sump bolts are torqued to: 15Nm.
A common mistake people make when installing the sump is to use excessive sealer, which when the sump is tightened, is squeezed out internally and ends up clogging the pick-up pipe causing oil starvation issues in the future. We recommend ensuring that both surfaces are thoroughly cleaned before installation. A 1-2mm bead of sealer is all that is required around the faces of the sump. This stops excessive sealer from dropping inside the sump whilst providing enough to prevent oil leaks.
Sump Plug
The sump plug consists of a bolt and a copper washer. When doing a oil change, it is strongly recommended to replace the copper washer each time it has been loosened. The bolt should ideally be changed, but you can get 2-3 changes before we’d recommend replacing the bolt aswell for re-assurance.
The sump plug bolt is torqued up to: 30Nm
Oil Level Sensor
Some engines are equipped with a oil level sensor to alert the driver when the oil level is becoming too low. This sensor has a rubber seal and 3 bolts holding it to the sump.
It is recommended to renew the rubber seal each time.
The torque setting for the bolts is: 10Nm
Connecting Rods
If you are ever re-installing the standard connecting rods, you will need to renew the nuts that hold the bearing cap on. These bolts should be torqued with some oil lubrication on the threads and the mating surfaces (don’t forget your engine assembly lube on the bearings!).
The torque setting for the bolts is:
Renew bolts: Yes
- Stage 1: 30Nm
- Stage 2: 90* (1/4 turn)
If you are just tightening for measuring bearing clearances, then 30nm will be enough for this initial assessment.
Crankshaft Pulley Bolt
This is a big one to tighten up and will take some effort. It holds the timing belt gear onto the crankshaft. You may need some counter-hold tool or to put car in gear and have someone put their foot on the brake whilst you do the 90* part.
It is recommended to Renew this bolt.
The torque setting for the bolts is:
Renew bolts: Yes
- Stage 1: 90Nm
- Stage 2: 90* (1/4 turn)
Water Pump
There are 3 bolts that hold the water pump in place on the bolt. Also included is a rubber o-ring to seal it in to stop any water leaks. These bolts do not need renewing.
The torque setting for the bolts is: 15Nm
Harmonic Balancer
There harmonic balancer is a crucial part for dampening any crankshaft oscillations and helps ensure everything is running smoothly. It is held on with 4x 6mm allen key bolts. Once these are loose, you may need to gently tap each side of the face: 12, 3, 6, 9pm to loosen it off the crank pulley.
The torque setting for the bolts is: 25Nm
Knock Sensor
The knock sensors are a finely tuned microphone listening to the combustion cycle in the engine cylinder. They should be installed on a clean/rust-free surface. It is required to renew the bolts that hold the sensors to the block to ensure this connection is correct.
Renew bolts: Yes
The torque setting for the bolts is: 20Nm
Engine Mount to Block
This is for the large aluminium block that bolts directly to the block next to the timing belt. It has 3 bolts that hold it on. It is recommend to renew these bolts if the mount has been removed.
Renew bolts: Yes
The torque setting for the bolts is: 45Nm
Thermostat Housing
The thermostat is housed inside a little plastic casing with a coolant pipe leading to the radiator, right next to the alternator.
The torque setting for the bolts is: 15Nm
Crank Sensor/Engine Speed Sensor
The crank sensor measures how fast the engine is turning over and is used by the ECU for a wide range of maps to assist it running. The sensor has a small rubber o-ring inside to prevent any oil leaks, so ensure that the sealing surfaces are clean and free from debris.
The torque setting for the bolts is: 10Nm
Oil Filter Housing
The oil filter housing is held on with 4x bolts and a large metal formed gasket. It is recommended to renew the gasket AND the bolts upon re-installation.
The torque setting for these bolts are:
Renew bolts: Yes
Renew Gasket: Yes
- Stage 1: 15Nm
- Stage 2: 90* (1/4 turn)
Recent Comments